Battery switch on travel trailer function is crucial for managing your RV’s power. Understanding how to use and maintain your battery switch is key to preventing electrical issues and ensuring a smooth camping experience. This guide covers various switch types, troubleshooting tips, installation advice, and maintenance best practices, equipping you to confidently handle your travel trailer’s power system.
We’ll explore the different types of battery switches – single-pole, double-pole, and double-pole double-throw – detailing their pros and cons, wiring diagrams, and installation complexities. We’ll also delve into how the switch interacts with various power sources like shore power, generators, and your RV’s battery bank, emphasizing safety procedures throughout. Finally, we’ll offer maintenance tips to extend the life of your battery switch and prevent common problems.
Battery Switch Installation and Wiring: Battery Switch On Travel Trailer Function
Installing a battery switch in your travel trailer is a straightforward process that significantly improves safety and control over your trailer’s electrical system. This allows you to disconnect the house batteries completely, preventing accidental drain and potential damage to your electrical components. Proper installation ensures reliable operation and prevents electrical hazards.
Tools and Materials
Before you begin, gather the necessary tools and materials. This will make the installation process much smoother and safer. You’ll need a battery switch rated for the amperage of your battery bank (check your battery’s specifications), appropriately sized battery cables (preferably marine-grade for corrosion resistance), wire connectors (crimp-on ring terminals are recommended), a wire stripper/cutter, a wrench or socket set that fits your battery terminals and the switch mounting hardware, a multimeter to test your connections (highly recommended), and safety glasses.
Don’t forget electrical tape for added insulation.
Battery Switch Mounting and Wiring
First, choose a suitable location for the battery switch. It should be easily accessible but protected from the elements. Securely mount the switch using the provided hardware. Ensure the switch is firmly attached and won’t vibrate loose during travel. Next, connect the battery cables to the battery switch.
The positive (+) cable from the battery should connect to the positive (+) terminal of the switch, and the negative (-) cable from the battery to the negative (-) terminal of the switch. Use appropriately sized ring terminals and crimp them securely onto the cable ends before attaching them to the switch terminals. Always double-check your connections to ensure a tight fit.
So, you’re prepping for a road trip? Awesome! First things first: make sure your travel trailer’s power is sorted. Understanding the function of your battery switch on travel trailer function is crucial for avoiding dead batteries. Once that’s handled, you can focus on the fun stuff, like setting up your awesome audiophile travel aetup for those epic sunset listening sessions.
Seriously, good sound on the road makes all the difference!
Crimped connections should be further secured with heat-shrink tubing or electrical tape.
Connecting to the Charging System and Other Components
Now, connect the other electrical components to the switch. The positive (+) side of the switch should connect to the positive (+) input of your charging system (converter/charger). The negative (-) side of the switch connects to the negative (-) input of your charging system. This will allow you to control power to your entire 12V system with the battery switch.
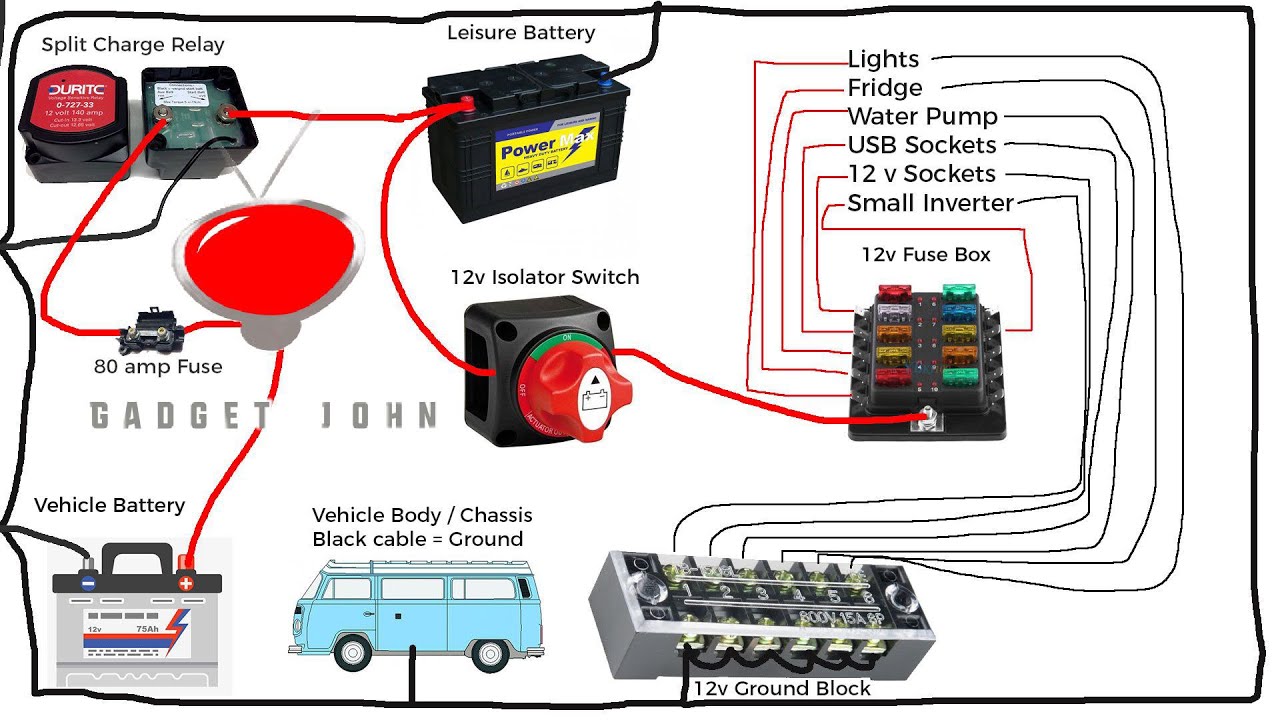
Remember, you should connect to the charging system’s input side, not the output side. The diagram below illustrates a typical setup. Always disconnect the negative battery terminal before making any electrical connections to prevent accidental short circuits.
So, you’re prepping for a road trip? Awesome! First things first: make sure your travel trailer’s power is sorted. Understanding the function of your battery switch on travel trailer function is crucial for avoiding dead batteries. Once that’s handled, let’s talk tunes! If you’re an audiophile, you’ll want to check out this guide on audiophile travel aetup to make sure your music sounds amazing on the road.
Getting your power and audio set up correctly will make your trip way more enjoyable.
Wiring Diagram
| Component | Positive (+) Connection | Negative (-) Connection | Notes |
|---|---|---|---|
| Battery | Battery (+) terminal | Battery (-) terminal | |
| Battery Switch | Battery (+) cable | Battery (-) cable | Rated for appropriate amperage |
| Charging System (Converter/Charger) | Battery Switch (+) terminal | Battery Switch (-) terminal | Connect to the input side of the charger |
| 12V Electrical System | Battery Switch (+) terminal (via fuse block) | Battery Switch (-) terminal (via ground bus) | Protected by appropriate fuses/circuit breakers |
Battery Switch and Deep Cycle Batteries
Choosing the right battery switch for your travel trailer is crucial, especially when considering the type of batteries you’ll be using. Deep-cycle batteries, designed for sustained power delivery rather than short bursts of high current, are the standard for RVs and travel trailers. Understanding their interaction with a battery switch is key to maximizing their lifespan and preventing damage.Deep-cycle batteries are specifically engineered to provide consistent power over an extended period.
Unlike starting batteries found in cars, which are built for high-current bursts to crank the engine, deep-cycle batteries are meant to be discharged and recharged repeatedly without significant performance degradation. This makes them ideal for powering appliances and lights in your travel trailer.
Battery Switch Protection of Deep-Cycle Batteries
The battery switch plays a vital role in protecting your deep-cycle batteries from over-discharge. Over-discharge occurs when the battery is drained to a voltage level that can damage its internal components, leading to reduced capacity and lifespan. A properly installed and used battery switch allows you to isolate the batteries from the trailer’s electrical system, preventing them from being completely drained.
This is especially important if you leave your trailer unused for extended periods. By switching off the battery, you effectively prevent parasitic drains from things like interior lights or alarm systems from slowly depleting your battery.
Importance of Correct Battery and Switch Compatibility
Using the correct type of battery with your battery switch is essential for safety and performance. Different battery switches have different voltage and amperage ratings. A switch rated for lower voltage or amperage than your battery system can overheat or fail, potentially causing damage to the switch, wiring, or even the batteries themselves. Conversely, using a switch with too high a rating is generally safe, but may be unnecessary and more expensive than needed.
Matching the switch’s capacity to the battery bank’s needs ensures optimal performance and longevity.
Battery Type and Switch Compatibility Comparison, Battery switch on travel trailer function
This table compares different battery types and their compatibility with various battery switches. Note that this is a general guideline, and always consult the manufacturer’s specifications for both your battery and your battery switch to ensure compatibility.
| Battery Type | Voltage | Typical Amperage (Capacity) | Suitable Switch Rating (Example) |
|---|---|---|---|
| Flooded Lead-Acid (FLA) | 12V | 100-200Ah | 12V, 200A |
| Absorbent Glass Mat (AGM) | 12V | 100-200Ah | 12V, 200A |
| Gel Cell | 12V | 50-100Ah | 12V, 100A |
| Lithium Iron Phosphate (LiFePO4) | 12V | 100-300Ah | 12V, 300A (or higher, depending on the specific battery’s discharge rate) |
Mastering your travel trailer’s battery switch is essential for safe and reliable power management. By understanding the different types of switches, their functions, and how to troubleshoot common problems, you can prevent electrical headaches and enjoy worry-free camping adventures. Regular maintenance and careful operation will ensure your battery switch serves you well for years to come, keeping your lights on and your appliances running smoothly.
Clarifying Questions
What happens if my battery switch is faulty?
A faulty switch can lead to no power, intermittent power, or even overheating. This could damage your batteries or other electrical components.
How often should I inspect my battery switch?
Ideally, inspect your battery switch at least once a year, or more frequently if you use your travel trailer extensively.
Can I use any type of battery with any battery switch?
No, compatibility is crucial. Some switches are designed for specific battery types and amperage ratings. Check your switch’s specifications and your battery’s.
What are the signs of a failing battery switch?
Signs include unusual noises (clicking, buzzing), difficulty switching positions, overheating, loose connections, or corrosion.
